[ Python / PIL ] PIL 이미지, Numpy 배열 변환 및 저장 ( Image.fromarray(), np.array(), np.asarray() )
2021.12.29 - [Computer Language/Python] - [ Python / PIL ] Image (open, save) [ Python / PIL ] Image (open, save) Python Imaging Library (PIL) PIL은 파이썬에서 이미지 분석 및 처리를 쉽게 할 수 있는..
supermemi.tistory.com
1. PIL 이미지, Numpy 배열 구조
앞선 글에서 PIL 이미지를 numpy.ndarray 로 바꾸는 방법에 대해서 다루었다.
numpy.ndarray의 경우 "H x W x C" 의 구조를 가지고 있다.
H : height 높이
W : width 너비
C : channel 채널 (RGB 컬러의 경우 3, grayscale의 경우 1또는 0)
이미지 픽셀 밝기 값은 0~255의 범위를 가진다.

위의 memi.jpg 이미지는 Gray scale 이미지이기 때문에 RGB 예시를 위해 아래 코드와 같이 RGB 포멧으로 convert 해줘야 합니다.
from PIL import Image
import numpy as np

img_Gray = Image.open('memi.jpg')
img_RGB  = Image.open('memi.jpg').convert('RGB')

img_Gray_array = np.array(img_Gray)
img_RGB_array  = np.array(img_RGB)

print(f'Gray Image shape : {img_Gray_array.shape}') # 428 x 428
print(f'RGB  Image shape : {img_RGB_array.shape}')  # 428 x 428 x 3

print(f'Gray Value Scale : {img_Gray_array.min()}~{img_Gray_array.max()}') # 0~255
print(f'RGB  Value Scale : {img_RGB_array.min()}~{img_RGB_array.max()}')   # 0~255
2. Pytorch Image Tensor 구조
딥러닝 라이브러리 Pytorch의 Image tensor 경우 "C x H x W" 의 구조를 가진다.
즉, Channel의 위치가 변경되는 문제가 발생한다.
또한 이미지 픽셀 밝기 값은 0~255의 범위에서 0~1의 범위로 변경된다.
이를 해결하기 위하여 torchvision.transforms 모듈을 이용한다.
torchvision.transforms — Torchvision 0.11.0 documentation
torchvision.transforms Transforms are common image transformations. They can be chained together using Compose. Most transform classes have a function equivalent: functional transforms give fine-grained control over the transformations. This is useful if y
pytorch.org
3. PIL 이미지, Numpy 배열 ---> Pytorch Image Tensor
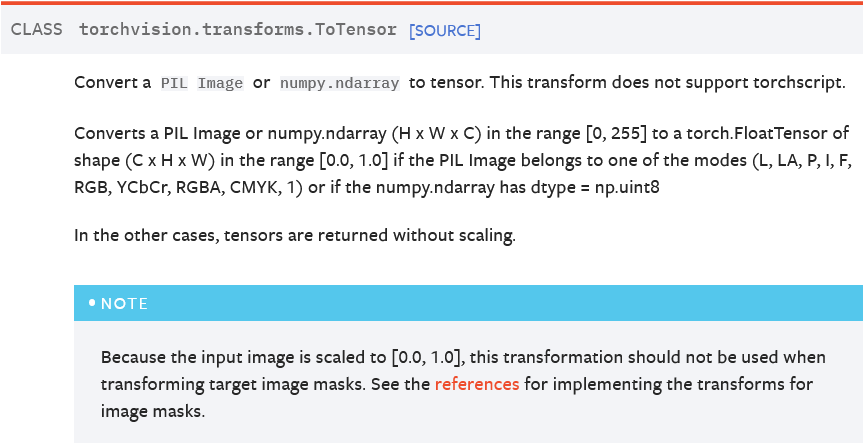
PIL이미지 또는 Numpy배열에서 pytorch Image Tensor로 변환하는 과정에서 두가지가 바뀌어야한다.
torchvision.transforms.ToTensor() 를 이용하면 간단하다.
1. 배열구조
"H x W x C" → "C x H x W"
2. 이미지 픽셀 밝기 정도(scale)
[0~255] → [0~1]
4. Pytorch Image Tensor ---> PIL 이미지, Numpy 배열
이번에는 반대로 변환하는 것을 다뤄보자.
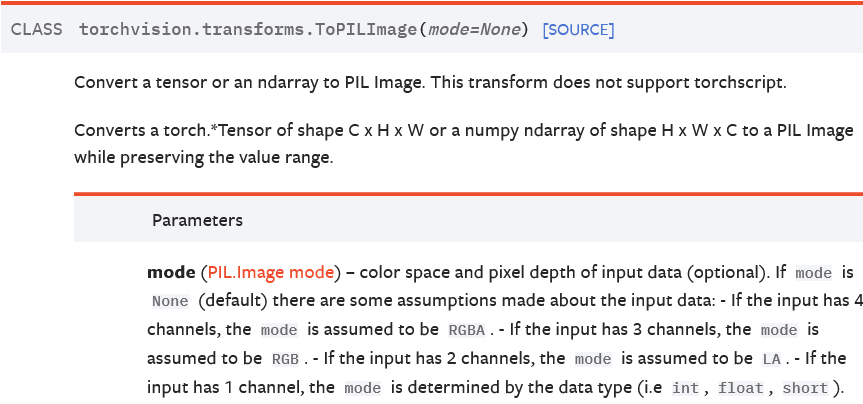
torchvision.transforms.ToPILImage() 를 이용하면 간단하다.
1. 배열구조
"C x H x W" → "H x W x C"
2. 이미지 픽셀 밝기 정도(scale)
[0~1] → [0~255]
5. 예시코드
from torchvision.transforms import ToTensor, ToPILImage
from PIL import Image
import numpy as np


img_RGB  = Image.open('memi.jpg').convert('RGB')
img_RGB_array  = np.array(img_RGB)

print(f'RGB  Image shape : {img_RGB_array.shape}')  # 428 x 428 x 3
print(f'RGB  Value Scale : {img_RGB_array.min()}~{img_RGB_array.max()}') # 0~255


# torchvision.transforms.ToTensor
tf_toTensor = ToTensor()


# PIL to Tensor
img_RGB_tensor_from_PIL = tf_toTensor(img_RGB)

print(img_RGB_tensor_from_PIL)
print(img_RGB_tensor_from_PIL.size()) # 3 x 428 x 428
print(img_RGB_tensor_from_PIL.min(), img_RGB_tensor_from_PIL.max()) # 0~1


# Numpy array to Tensor
img_RGB_tensor_from_ndarray = tf_toTensor(img_RGB_array)

print(img_RGB_tensor_from_ndarray)
print(img_RGB_tensor_from_ndarray.size()) # 3 x 428 x 428
print(img_RGB_tensor_from_ndarray.min(), img_RGB_tensor_from_ndarray.max()) # 0~1


# torchvision.transforms.ToPILImage
tf_toPILImage = ToPILImage()

img_PIL_from_Tensor = tf_toPILImage(img_RGB_tensor_from_PIL)

print(np.array(img_PIL_from_Tensor)) # 0~255
print(np.array(img_PIL_from_Tensor).shape) # 428 x 428 x 3


# Check values between numpy array and tensor
print(np.sum(~(img_RGB_array==np.array(img_PIL_from_Tensor)))) # 0 means all same


