[ PyTorch / torchvision ] draw_segmentation_masks() 사용하기

[ 이전 글 ]
[ PyTorch / torchvision ] draw_bounding_boxes() 사용하기
[ PyTorch / torchvision ] make_grid() 사용하기
[ Pytorch ] nn.BCELoss, nn.BCEWithLogitsLoss, nn.CrossEntropyLoss, nn.NLLLoss 총정리
[ Pytorch ] 파이토치 텐서 합치는 방법 : cat(), stack() ( + dim의 의미와, 병합 방식의 차이)
torchivision.utils.draw_segmentation_masks (링크)
RGB 이미지에 Sementation masks 를 합쳐주는 함수입니다.
Input 이미지는 0~255 사이의 값(uint8)을 가져야 합니다.

parameters
- image (Tensor) : Tensor (3, Height, Width) and ← (dtype:unit8)
- masks (Tensor) : Tensor (num_masks, Height, Width) or (Height, Width) ← (dtype:bool)
- alpha (float) : 투명도를 결정. 0(투명)~1(불투명).
- colors (color or list of colors, optional) : Bounding Box의 색을 담은 리스트 또는 전체 바운딩 박스 색을 통일. PIL string(e.g. "red" or "#FF00FF", RGB tuple(e.g. (240, 10, 157)) 등으로 표현. (Default : 박스마다 랜덤 컬러)
- (torchvision version : 0.13 기준)
returns
- tensor : 새그멘테이션 마스크가 표현된 uint8 이미지 텐서 (Channel, Height, Width)
예시
- 1 ) 시각화 코드
- 2 ) draw_segmentation_masks 적용 : Semantic Segmentation (fcn_resnet50 사용)
- 3 ) draw_segmentation_masks 적용 : Instance Segmentation (maskrcnn_resnet50_fpn 사용)
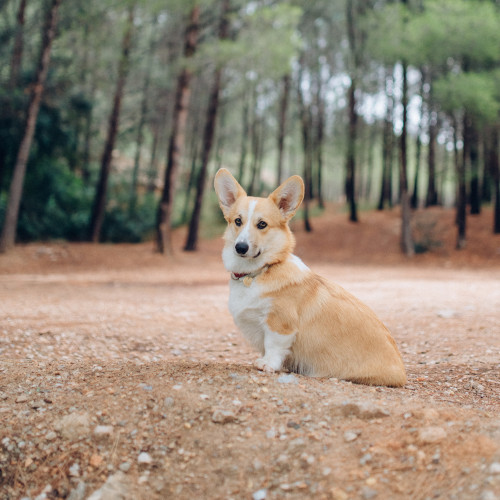
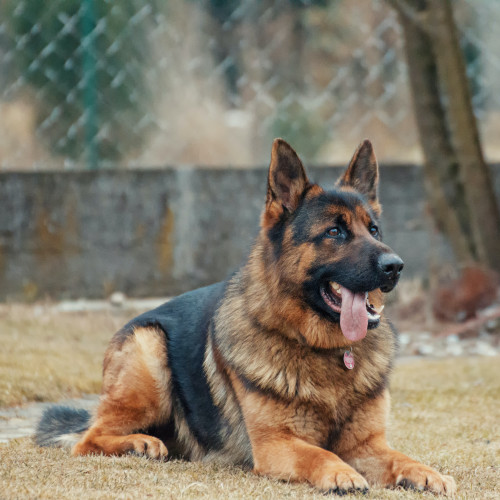
사용된 사진 : dog1.jpg, dog2.jpg
아래의 사진을 다운 받으셔서 assets 이라는 파일 아래에 저장해주세요.
ex) assets/dog1.jpg
1 ) 시각화 코드
draw_segmentation_masks() 의 결과를 확인하기 위한 시각화 코드입니다.
# code from https://pytorch.org/vision/stable/auto_examples/plot_visualization_utils.html

import torch
import numpy as np
import matplotlib.pyplot as plt

import torchvision.transforms.functional as F

plt.rcParams["savefig.bbox"] = 'tight'

def show(imgs):
    if not isinstance(imgs, list): # 하나의 이미지일때
        imgs = [imgs]
    fig, axs = plt.subplots(ncols=len(imgs), squeeze=False) # 총 사진의 개수만큼 plot
    for i, img in enumerate(imgs):
        img = img.detach() # 학습 그래프에서 제외
        img = F.to_pil_image(img) # torch.tensor 에서 pil 이미지로 변환
        axs[0, i].imshow(np.asarray(img)) # numpy 배열로 변경후, 가로로 이미지를 나열
        axs[0, i].set(xticklabels=[], yticklabels=[], xticks=[], yticks=[])
위의 코드를 이해하기 위해서는 아래의 글을 참고하시면 좋습니다.
[ Python / PIL ] PIL 이미지와 Torch.Tensor 변환 (ToTensor, ToPILImage)
[ Python / PIL ] PIL 이미지와 Torch.Tensor 변환 (ToTensor, ToPILImage)
2021.12.29 - [Computer Language/Python] - [ Python / PIL ] PIL 이미지, Numpy 배열 변환 및 저장 ( Image.fromarray(), np.array(), np.asarray() ) [ Python / PIL ] PIL 이미지, Numpy 배열 변환 및 저장 (..
supermemi.tistory.com
2 ) draw_segmentation_masks 적용 : Semantic Segmentation (fcn_resnet50 사용)
- 사전학습된 fcn_resnet50을 이용하여 semantic segmentation 진행
from torchvision.models.segmentation import fcn_resnet50, FCN_ResNet50_Weights
from torchvision.io import read_image
from pathlib import Path

# Data load
dog1_int = read_image(str(Path('assets') / 'dog1.jpg'))
dog2_int = read_image(str(Path('assets') / 'dog2.jpg'))
dog_list = [dog1_int, dog2_int]

# Preprocessing
weights = FCN_ResNet50_Weights.DEFAULT
transforms = weights.transforms(resize_size=None)
batch = torch.stack([transforms(d) for d in dog_list])

# Define model
model = fcn_resnet50(weights=weights, progress=False)
model = model.eval()

# Inference
output = model(batch)['out']
print(output.shape, output.min().item(), output.max().item())
- semantic segmentation output은 (batch_num, # of classes, Height, Width)의 형태로 만들어집니다.
- [2,21,500,500] 는 2개의 input 이미지 에 대한 21개의 클래스별 500 X 500 segmentation mask 들을 의미합니다.
- 여기서, 21개의 클래스별 마스크란 각 클래스별로 해당하는 물체가 이미지에 존재할 경우 channel 로 나타난다는 것입니다.
- 그런데 segmentation model 의 output value range가 normalized 되지 않았습니다. (-7.xx ~ 14.xx)
- 이 값들을 channel wise softmax 함수를 통해 [0,1] 값으로 normalize 할 수 있습니다.
- 즉, 픽셀별로 해당하는 클래스의 확률을 구할 수 있습니다.
# 클래스별로 인덱스를 부여
sem_class_to_idx = {cls: idx for (idx, cls) in enumerate(weights.meta["categories"])}

# Channel wise 로 softmax 진행
normalized_masks = torch.nn.functional.softmax(output, dim=1)

# 예시 - dog, boat에 해당하는 channel만 남김
dog_and_boat_masks = [
    normalized_masks[img_idx, sem_class_to_idx[cls]]
    for img_idx in range(len(dog_list))
    for cls in ('dog', 'boat')
]

# 시각화 - dog, boat에 해당하는 channel만 시각화
show(dog_and_boat_masks)
- draw_segmentation_masks() 함수를 사용하기 위해서는 boolean type의 값을 가져야 합니다.
- 그러나 위의 normalized mask 는 0 에서 1 사이의 값으로 구성되어 있기 때문에 이를 바꾸어 줘야 합니다.
class_dim = 1 # class channel

# dog 인 부분만 뽑아냄
boolean_dog_masks = (normalized_masks.argmax(class_dim) == sem_class_to_idx['dog'])

print(f"shape = {boolean_dog_masks.shape}, dtype = {boolean_dog_masks.dtype}")

show([m.float() for m in boolean_dog_masks])- argmax 함수가 어떻게 구현되는지 잘 아셔야 합니다.
- argmax 함수를 channel dim에 사용한다는 것은, 각 픽셀별로 가장 높은 확률값을 가지는 class index를 남기게 됩니다.

- 이때, dog 의 channel index 는 12 입니다.
- 그래서 argmax한 결과에서 12인 숫자를 가진 픽셀만 남기는 것입니다.
- 즉, segmentation output 에서 dog일 확률이 가장 큰 픽셀만 True 값으로 바꾸고, 나머지는 모두 False로 바꾸게 됩니다.
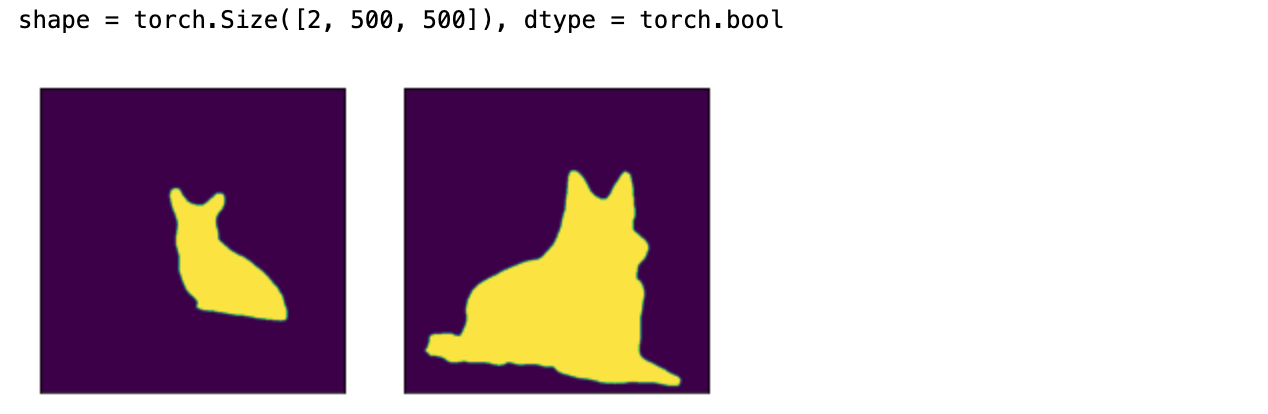
- 최종적으로 깔끔하고 예쁜 mask 를 얻게 되었습니다.
이제 draw_segmentation_masks 함수를 사용하여, 원본 이미지에 mask 를 합칠 수 있습니다.
from torchvision.utils import draw_segmentation_masks

dogs_with_masks = [
    draw_segmentation_masks(img, masks=mask, colors='red', alpha=0.7)
    for img, mask in zip(dog_list, boolean_dog_masks)
]
show(dogs_with_masks)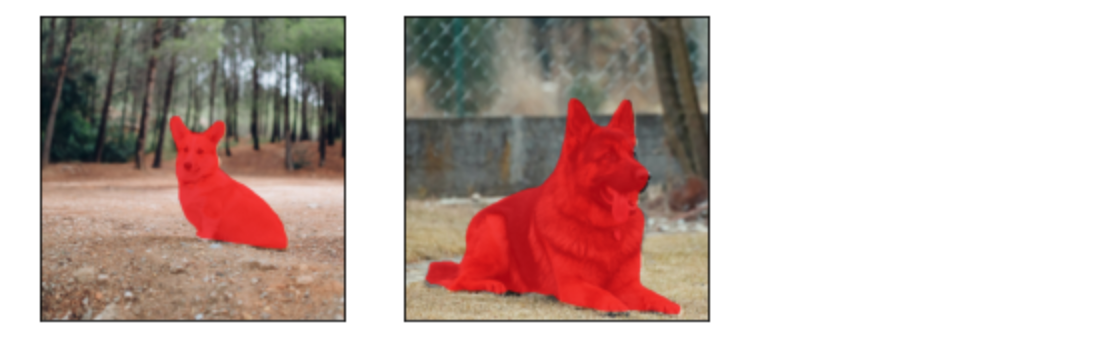
- 만약, 사진안에 여러개의 class 가 존재할 경우에는 어떻게 동시에 표현할 수 있을까요??
- 위의 dog1 사진은 크개 두 개(배경, 강아지)의 클래스가 존재합니다.
num_classes = normalized_masks.shape[1] # 전체 클래스 수 21개 존재

dog1_masks = normalized_masks[0] # dog1 data, shape : (21,500,500), 0~1 확률값
class_dim = 0 # (channel, height, width) 에서 channel이 21개 존재

dog1_all_classes_masks = dog1_masks.argmax(class_dim) == torch.arange(num_classes)[:, None, None]
# argmax를 통해 가장 확률이 높은 channel 인덱스 텐서를 구함, shape : (500,500)
# torch.arange(num_classes)[:,None,None] 를 통해 텐서를 구함, shape : (21,1,1)
# (500,500) == (21,1,1) 을 통해 (21,500,500) Boolean 텐서를 만들어냄

print(f"dog1_masks shape = {dog1_masks.shape}, dtype = {dog1_masks.dtype}")
print(f"dog1_all_classes_masks = {dog1_all_classes_masks.shape}, dtype = {dog1_all_classes_masks.dtype}")

dog_with_all_masks = draw_segmentation_masks(dog1_int, masks=dog1_all_classes_masks, alpha=.6)
show(dog_with_all_masks)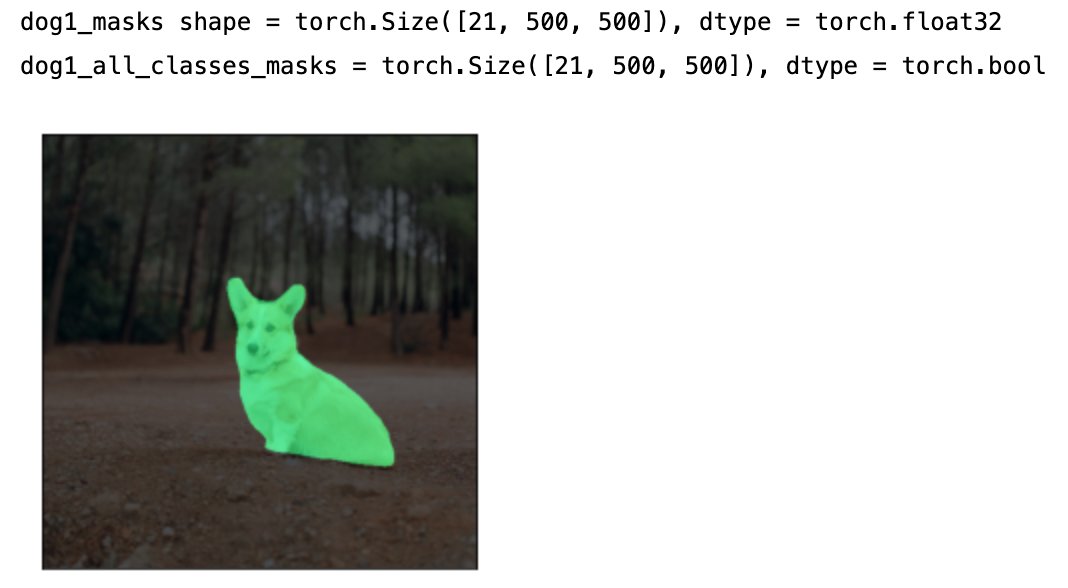
- 주어진 이미지에서는 강아지 클래스와 배경 클래스만 존재함으로 위와같이 시각화 되었습니다.
- 진행과정은 코드에 다 담겨있으니 찬찬히 읽어보시면 이해가실 겁니다.
- 이와 동일하게, 여러개의 이미지에 대해서 한번에 적용가능한 코드는 다음과 같습니다.
class_dim = 1
all_classes_masks = normalized_masks.argmax(class_dim) == torch.arange(num_classes)[:, None, None, None]
print(f"shape = {all_classes_masks.shape}, dtype = {all_classes_masks.dtype}")
# The first dimension is the classes now, so we need to swap it
all_classes_masks = all_classes_masks.swapaxes(0, 1)

dogs_with_masks = [
    draw_segmentation_masks(img, masks=mask, alpha=.6)
    for img, mask in zip(dog_list, all_classes_masks)
]
show(dogs_with_masks)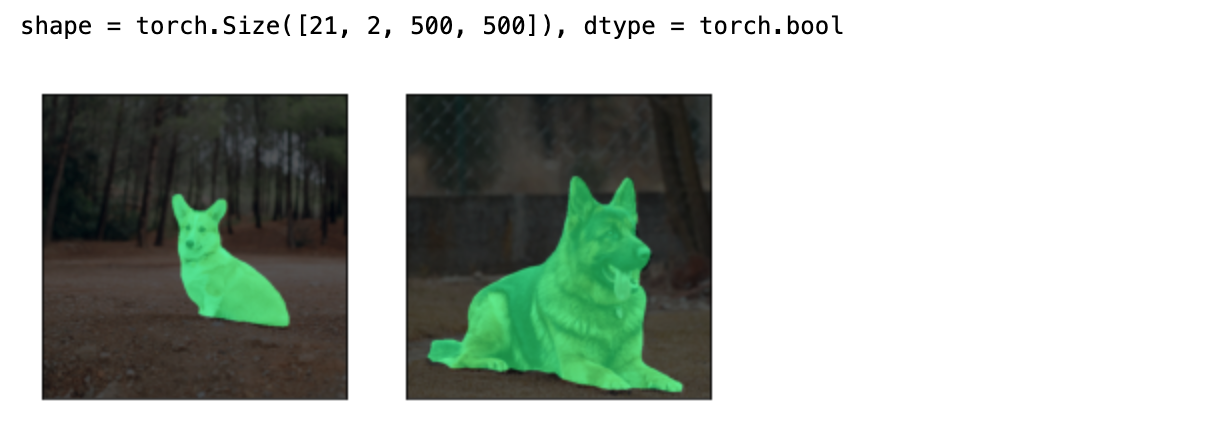
3 ) draw_segmentation_masks 적용 : Instance Segmentation (maskrcnn_resnet50_fpn 사용)
이번 예시에서는 사전 학습된 maskrcnn 을 이용한 instance segmentation 결과에 draw_segmentation_masks 를 적용하는 과정이 담겨있습니다.
- 먼저 모델을 불러와서 전처리 후 이미지에 적용해 줍니다.
from torchvision.models.detection import maskrcnn_resnet50_fpn, MaskRCNN_ResNet50_FPN_Weights

weights = MaskRCNN_ResNet50_FPN_Weights.DEFAULT
transforms = weights.transforms()

images = [transforms(d) for d in dog_list]

model = maskrcnn_resnet50_fpn(weights=weights, progress=False)
model = model.eval()

output = model(images)
print(output)
- maskrcnn은 이미지 안에 존재하는 각 객체(instance)들의 boxes, labels, scores, masks 정보를 딕셔너리 타입으로 저장합니다.
- 즉, 위의 예시에서 model은 두개의 이미지를 input으로 받았기 때문에, output 은 딕셔너리 2개가 들어있는 리스트가 됩니다.
dog1_output = output[0] # 첫번째 이미지에 대한 결과
dog1_masks = dog1_output['masks'] # 첫번째 이미지의 마스크 정보
print(f"shape = {dog1_masks.shape}, dtype = {dog1_masks.dtype}, "
      f"min = {dog1_masks.min()}, max = {dog1_masks.max()}")
- 결과를 자세히 보면, 첫 번째 이미지에는 3개의 객체가 검출 되었습니다.
- 그리고 predicted mask 의 값은 이미 0~1 사이로 normalized 되어 있습니다.
- 이는 각 픽셀이 어떤 객체에 해당하는지에 대한 확률값입니다.
- Threshold 를 설정하여 0또는 1의 값으로 나타낼 수 있습니다. (예시에서는 0.5를 기준으로 설정했습니다.)
- output 딕셔너리에 label 키를 검색하면 객체의 예측된 라벨을 알 수 있습니다.
print("For the first dog, the following instances were detected:")
print([weights.meta["categories"][label] for label in dog1_output['labels']])
- 그런데 주어진 첫번째 강아지 사진에서 person 이라는 객체가 있었나요???????
proba_threshold = 0.5
dog1_bool_masks = dog1_output['masks'] > proba_threshold
print(f"shape = {dog1_bool_masks.shape}, dtype = {dog1_bool_masks.dtype}")

# There's an extra dimension (1) to the masks. We need to remove it
dog1_bool_masks = dog1_bool_masks.squeeze(1)

show(draw_segmentation_masks(dog1_int, dog1_bool_masks, alpha=0.9))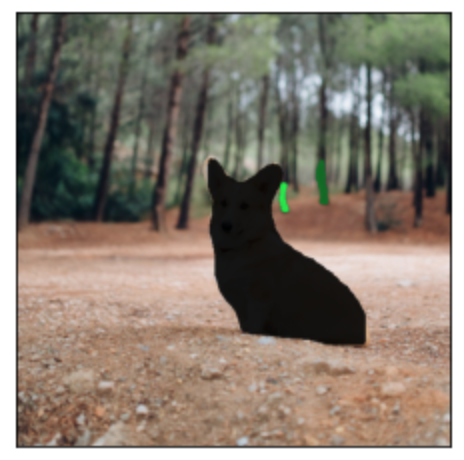
- 시각화 해보니 뒤에 있는 나무를 사람이라고 오인식 했네요!!!
- instance 별로 score 점수를 한번 확인해 봅시다!!
print(dog1_output['scores'])
- 0.7 정도의 확신을 가지고 사람이라고 인식하고 있네요.
- 이때, 확실한 것(score threshold = 0.8)들만 남겨서 표시할 수도 있습니다.
score_threshold = .8
proba_threshold = 0.5

boolean_masks = [
    out['masks'][out['scores'] > score_threshold] > proba_threshold
    for out in output
]

dogs_with_masks = [
    draw_segmentation_masks(img, mask.squeeze(1))
    for img, mask in zip(dog_list, boolean_masks)
]
show(dogs_with_masks)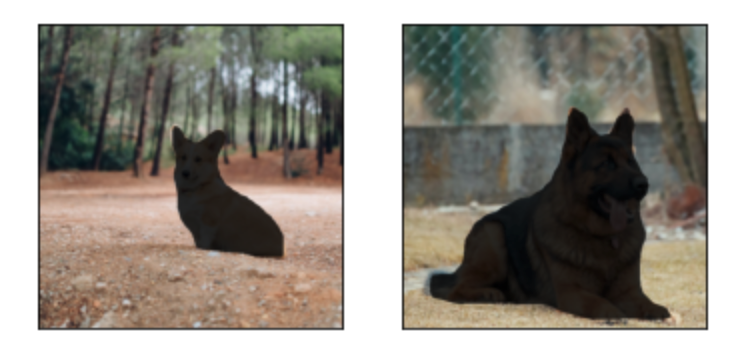
- 사람을 인식한 객체의 score 가 둘다 0.8 이하기 때문에 제외되고, 0.8 이상으로 확신하는 강아지만 시각화된 것을 보실 수 있습니다.
[ 참고 ]
https://pytorch.org/vision/stable/auto_examples/plot_visualization_utils.html
'컴퓨터 언어 > Python_Pytorch' 카테고리의 다른 글
| [ PyTorch / torchvision ] draw_bounding_boxes() 사용하기 (0) | 2022.08.30 |
|---|---|
| [ PyTorch / torchvision ] make_grid() 사용하기 (0) | 2022.08.30 |
| [ Pytorch ] nn.BCELoss, nn.BCEWithLogitsLoss, nn.CrossEntropyLoss, nn.NLLLoss 총정리 (0) | 2022.08.21 |
| [ Pytorch ] 파이토치 텐서 합치는 방법 : cat(), stack() ( + dim의 의미와, 병합 방식의 차이) (0) | 2022.08.18 |
| [ Pytorch ] 파이토치 설치하기 (0) | 2021.08.10 |


